![[Previous]](../prev.gif) |
![[Contents]](../contents.gif) |
![[Index]](../keyword_index.gif) |
![[Next]](../next.gif) |
|
|
|
|
 |
This version of this document is no longer maintained. For the latest documentation, see http://www.qnx.com/developers/docs. |
GUI-based QNX Software Installer (QSI)
 |
QNX Neutrino no longer uses packages, but third-party software can. |
qnxinstall [options] [qpr_file]
Photon Options:
| If server_name is: | This server is used: |
|---|---|
| node_path | node_path/dev/photon |
| fullpath | fullpath |
| relative_path | /dev/relative_path |
Advanced Options:
The QNX Software Installer (QSI) provides a mechanism for you to manage packages on your system. It shows you all currently installed software, lets you manage the installed software, and lets you install new software from any location.
You can start the installer by typing qnxinstall at the command line, or by selecting Launch-->Software-->Installer from the Photon launch menu. The installer is a GUI-based application with standard buttons and controls.
|
The qnxinstall application is available only on self-hosted Neutrino machines. |
This description contains the following sections:
Under QNX Neutrino, you can execute qnxinstall only as a user with root privileges. If you're not logged in as root, qnxinstall will prompt you for the root password. You may execute only one instance of the QSI at a time, because it will modify your system software and restart the package filesystem (where necessary).
While executing, the QSI keeps a log of the activities that it performs. You can find the log at ${QNX_HOST}/etc/system/package/session.log (note that under Neutrino, $QNX_HOST is /). Five backups of session.log are kept as session.log.1, session.log.2, and so on.
QNX software is organized into packages, which hold any number of files. A number of packages form a product, which may include processor-specific and processor-independent packages. Products may be combined into a bundle. Combining a set of packages, products, or bundles into a single location forms a repository.
Packages, products, and bundles can be in different states. For a description of install states, see the Installing chapter of the Neutrino User's Guide.
When you start the QSI, a splash screen comes up and the following things happen:
The main installer window looks like this:
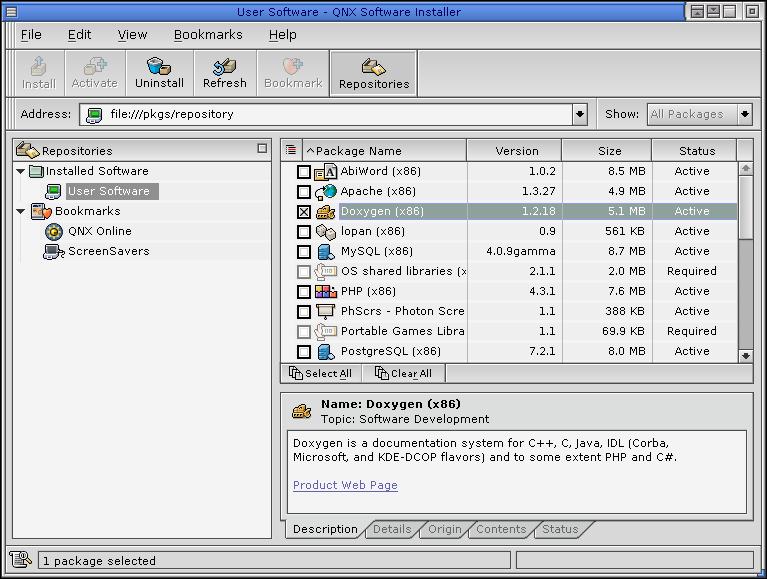
This window includes the following components:
The menu bar includes:
|
You can't act on individual packages in a bundle, but you can view details for each package by selecting it. |
This menu also lists the installed and bookmarked repositories. You can open a repository by selecting it from this menu.
The tool bar provides buttons for Install, Activate, Uninstall, Refresh, Bookmark, and toggle Repositories pane.
The address bar shows the current repository URL and a dropdown list of previously entered URLs. You can type a new repository URL in the address bar to open that repository.
The package filter allows you to limit the types of packages shown. You can select these options from the Show drop-down list to filter packages:
The Repositories pane includes:
The Packages pane includes a list of the packages in the current repository, as well as columns for Package Name, Version, Size, and Status that sort the packages in corresponding order. The topic sort button (Neutrino only) toggles the Topics view, which is equivalent to selecting View-->Show Topics. This pane also includes buttons for Select All and Clear All (Neutrino only).
The Package Info pane includes:
The status bar shows the total number of packages displayed if none are selected, or the number of packages selected. For installed repositories, the status bar also shows your free disk space, and the amount of disk space that woudl be freed if you selected the Remove Inactive option from the Edit menu.
There are several ways to open a repository:
Or:
Or:
Or:
When you open the repository, a status dialog appears with progress messages while the repository is being loaded. The Packages pane then displays a list of packages.
To find CD repositories:
To find web repositories:
To close the currently selected repository:
You can toggle the Repositories pane to be on (visible) or off (hidden) by using the toolbar button marked Repositories or by selecting the Repositories item on the View menu.
Bookmarks are an easy way to keep track of repositories you've opened. When you first start qnxinstall, you see a list of previously bookmarked repositories.
When you select a new repository, the Bookmark toolbar button becomes active, which means that you can add the repository to your bookmarks list (you can also use the Add Bookmarks item from the Bookmarks menu). When you add a bookmark, a dialog pops up, showing the repository name and location. You can edit the repository name if necessary, and optionally enter a user name and password if it's a secure repository.
You can edit the bookmarks list by using the Edit Bookmarks item from the Bookmarks menu. A dialog appears that lets you add, remove, and edit bookmark entries.
Once you've opened a repository, you'll see a list of packages in the Packages pane. If you select a package, the Packages Info pane shows more detailed information about it.
You can mark packages to install/uninstall/activate by clicking the checkbox next to the package. Once you've marked one or more packages, the toolbar buttons that correspond to the available actions for those packages become enabled. For example, marking New packages causes the Install button to become enabled, marking Installed packages causes the Uninstall button to become enabled, and marking both causes both buttons to become enabled. You can unmark a package by clicking the checkbox again.
You can view packages by topic using the View menu or topic sort button (described above). This creates a hierarchical view of the packages and their topic categories. You can mark an entire topic for install/uninstall/activate by clicking the checkbox next to the topic; all child packages are automatically marked.
To install software:
To uninstall software:
To activate software:
The Preferences dialog lets you configure the proxy settings that the installer uses when accessing web (FTP or HTTP) repositories. Here, you can turn on the proxy server and supply the address, port, username and password.
You can manually restart the package filesystem by selecting the Restart Package File System item from the File menu.
Open the CD repository on startup:
qnxinstall -r /fs/cd0/repository
Open the QNX WWW repository on startup:
qnxinstall -r http://packages.qnx.com/repository
Open the QPR repository on startup:
qnxinstall /home/bob/whatsit-2.1.3a-x86-public.qpr
Open the User Software repository on startup:
qnxinstall -l
"Package filesystem" in the Working With Filesystems chapter of the User's Guide
|
|
|
|